Dictator Gas Block Tuning & Maintenance

Dictator gas block

Tuning Instructions

  1. Remove any Magazines or ammunition feeding devices from the firearm and make sure the firearm is clear and unloaded.
  2. Turn the Regulator in towards the Gas Block until it can no longer rotate. This is the “off” position. In this position, the gas will be completely blocked from entering the Gas Tube. In this setting, you will have to cycle the gun manually.
  3. Turn the Regulator in the opposite direction as step 2. You should hear and/or feel a “click”. Each click is one position. Turn the regulator to the first click. You have slightly opened the gas port.
  4. Load one round in a magazine and insert it into your firearm. Following the rules of gun safety, fire the weapon.
  5. Observe whether the Bolt Carrier Group (BCG) cycled back and was held open by the Bolt Catch. In the first position, it is not likely.
  6. Remove the magazine and clear the firearm.
  7. Repeat steps 3-5 to open the gas flow incrementally until the Bolt Carrier Group (BCG) cycles back and is held open by the Bolt Catch.
  8. Remove the magazine and clear the firearm.
  9. Load a few rounds in the magazine and insert the magazine into your firearm. Following the rules of gun safety, fire the weapon consecutively and observe the ejection pattern of the brass. If the muzzle is 12 o’clock and the buttstock is 6 o’clock, you are looking to achieve consistent ejection at 3 o’clock.
  10. If the ejection is somewhere between 6 o’clock and 3 o’clock, repeat the clearing, firing, observing, clearing, and adjusting cycle, until the ejection does reach 3 o’clock. Your rifle is set.
  11. After shooting over time, you may notice your ejection becoming sluggish and moving back towards 6’oclock. If this is the case, remove the magazine, clear the firearm, and turn the Regulator to open the gas flow.

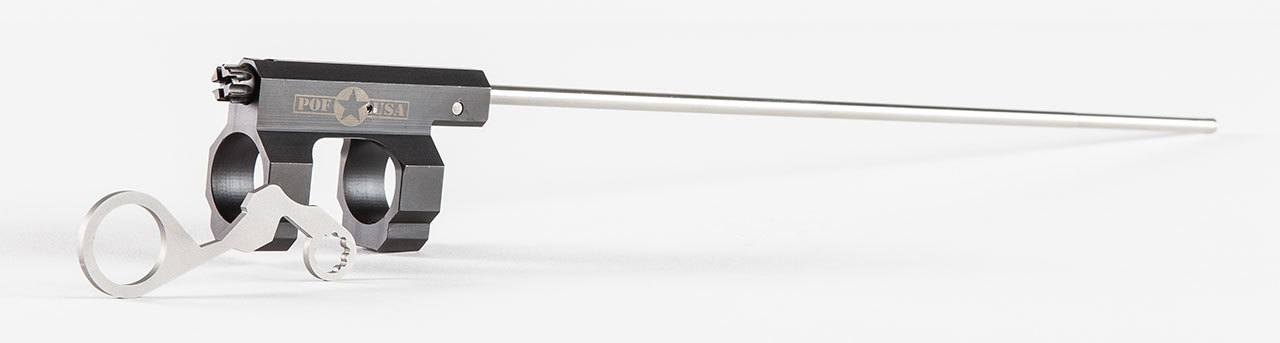
Note: This Gas Block will have a minimum of 9 positions, including the fully closed “off” positions. Your gas block may have 1 or 2 additional open positions. By design, there are 3 different tools you might use to adjust your Regulator. The first is the custom Wrench provided with the gas block. It is designed with a finger loop that will also allow it to be attached to your key chain. It also is small enough for storage in many grips. The custom Wrench has a unique shape because it has been optimized for use with POF-USA handguards. However, it can be used if you have installed your DIctator™ with a handguard that does not extend past the Gas Block. The second method is a 3/32” hex wrench. The third is a flat head screwdriver.

Maintenance 

After extended use, it may become difficult to adjust the Regulator. Below are the instructions for disassembly and cleaning.

Note: This diagram may be referenced for part descriptions and information.

  1. Remove any Magazines or ammunition feeding devices from the firearm and make sure the rifle is clear and unloaded.
  2. Using a drift pin punch, remove the Regulator Retaining Pin (Item 5) from the Gas Block.
  3. Spray some carbon cleaner into the hole at the top of the Gas Block (Item 1), and allow it to soak in. A liberal application may be required.
  4. Using the custom POF-USA Wrench, a flat screwdriver or 3/32” hex wrench, work the Regulator (Item 4) back and forth to break up the carbon built up on the threads.
  5. Using the custom POF-USA Wrench, a flat screwdriver or 3/32” hex wrench, turn the Regulator until it is completely unthreaded. If it will not completely unthread, repeat steps 3-4 until it will. Once you have passed the threads, the Regulator Ball Detent (Item 3), may engage them when attempting to remove the Regulator from the Gas Block. If this occurs, it is recommended to continue “unthreading” the Regulator until the threads have cleared the Regulator Ball Detent.
  6. Remove the Regulator from the gas block. Be aware of the location of the Regulator Ball Detent.
  7. Remove the Regulator Ball Detent and store it in a safe location.
  8. The Regulator Ball Detent Spring (item 2) will likely be held in place by force. For replacement purposes, please know that the spring is an AR-15 Extractor Spring. You may choose to remove it or not.
  9. Spray carbon cleaner into the open bore. Scrub and flush out the built-up carbon.
  10. If you removed the Regulator Ball Detent Spring, reinstall it. Push it all of the way down into the counterbore.
  11. Place the Regulator Ball Detent into the pocket in the bore. It should rest in place.
  12. Taking care not to displace the Regulator Ball Detent, carefully install the Regulator. If there is resistance when the threads interact with the Regulator Ball Detent, “screw” the threads over the Regulator Ball Detent. When the threads on the Regulator come into contact with the threads on the Gas Block, you may want to twist the Regulator in the unthreading direction while lightly pressing it into the Gas Block. You should be able to feel the thread starts to align. Screw the Regulator all the way in.
  13. Reinstall the Regulator Retaining Pin.

Cleaning

After each shooting session or 250 rounds, whichever comes first, or whenever your firearm has been exposed to sand, dust, extreme humidity, condensation, immersion in water, or other adverse conditions; disassemble, clean, and lubricate your firearm. 

  • Use only cleaning and lubrication products specifically designed for use on firearms. 
  • Wherever propellant gases directly contact operating system parts, carbon will build up.  Carbon cannot be removed with a brush and must be scrapped.
  • Wherever the term CLP (Cleaner-Lubricant-Protectant) or the words lube, or lubrication are used in this manual, it is interpreted to mean that you can use any lubricant designed for use on firearms.
  • Follow all manufactures instructions and cautions when using cleaning and lubrication products.
  • Do not use wire brushes on aluminum surfaces such as the upper/lower receivers, because this can scratch the finish.
CLEANING FIREARMS, OR HANDLING AMMUNITION MAY RESULT IN EXPOSURE TO LEAD AND OTHER SUBSTANCES KNOWN TO CAUSE BIRTH DEFECTS, REPRODUCTIVE HARM, AND OTHER SERIOUS PHYSICAL INJURY. MAINTAIN ADEQUATE VENTILATION AT ALL TIMES. WASH HANDS THOROUGHLY AFTER EXPOSURE. SHOOTING OR CLEANING FIREARMS MAY EXPOSE YOU TO LEAD.
magnifier linkedin facebook pinterest youtube rss twitter instagram facebook-blank rss-blank linkedin-blank pinterest youtube twitter instagram